
One year and seven months ago, I left the blog world hanging with this picture:
 |
| my homegrown scoby |
I had promised to teach you how to brew your own kombucha from the scoby that you grew yourself. Like the lyrics from that Naked Eyes tune, I made promises promises knowing that you believed, promises promises that I knew I'd never keep... ahem.
Perhaps you'd like to read a poem instead? Brief digression, I promise...
Here's the poem that's on the poetree right now:


I've read it five times on five separate occasions, and there is something new and revelatory each time I peruse it.
Oh, and I want to show you the cushions that I made for my bed too, and then we'll get to the kombucha:


I'm very pleased with these. Aren't they lovely?
Okay, KOMBUCHATIME.
Perhaps you'd like to read a poem instead? Brief digression, I promise...
Here's the poem that's on the poetree right now:


I've read it five times on five separate occasions, and there is something new and revelatory each time I peruse it.
Oh, and I want to show you the cushions that I made for my bed too, and then we'll get to the kombucha:


I'm very pleased with these. Aren't they lovely?
Okay, KOMBUCHATIME.
If you would like to learn how to grow your own scoby from scratch, instead of paying $15 - 20 for one, read here.
If you have a scoby, and need to brew a big batch o' booch, you're in the right place.
Take that nasty scoby and plunk it in a big jar - one that can hold 14 cups of liquid and your scoby.
It's okay to touch it if your hands are clean:

Oh yeah, feel that delicious, juicy squishiness! mmmmmmmmm

What I like about this is that you can see the many layers of cellulose if you look closely. This is one thick mother. :-)
Now that you've placed your scoby in a large glass vessel, add two cups of kombucha liquid, either from the booch that you've been storing your scoby in, or from a bottle of organic, unflavoured booch that you've purchased from a shop.

I use my own kombucha because I'm cheap, but if I were to buy it, I like GT's raw organic brand:

It is available at the Quartermaster, for those of you who live in London. It's ridiculously priced, 5 and change a bottle, which is why we're learning to brew our own booch.
So you've placed your scoby and 2 cups of booch in a vessel. Now you need to brew your tea. Boil 12 cups of water. Turn off the heat. Add 1 cup of sugar and stir until the sugar has dissolved. Add 6 tea bags of your choice (green, black etc). I usually use a combo of green or black, or just black. Basically, it's whatever I have on hand. Brew the tea until it's completely cooled. Remove the bags and place them in the compost. Carefully pour your tea into the vessel, with the scoby and booch, and seal it with a linen tea towel and an elastic. This will keep the fruit flies out while letting the kombucha breathe:
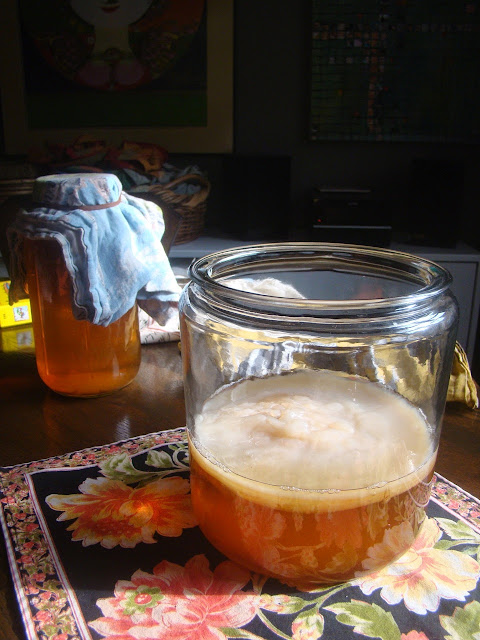
It will take approximately 6-14 days to brew your tea, depending on how weak or strong you like it, and what the weather's like (it will take longer to brew in the winter).
You can gauge the strength / intensity of your booch by taking off the tea towel, sticking a straw or clean spoon inside and sampling. I use this glass jug with a spigot (acquired at the Goodwill). It makes it very easy to sample the brew.

Once it's to your liking, reserve two cups of the booch and the scoby, and pour the rest of the brew into a pitcher and store it in the fridge. You can start a new batch using the reserved liquid and the scoby.
I like to serve kombucha on ice, with some frozen fruit thrown in. So tart and refreshing.

And that is it, my friends!
If you have a scoby, and need to brew a big batch o' booch, you're in the right place.
Take that nasty scoby and plunk it in a big jar - one that can hold 14 cups of liquid and your scoby.
It's okay to touch it if your hands are clean:
 |
| take a deep breath and plunge in... |

Oh yeah, feel that delicious, juicy squishiness! mmmmmmmmm
 |
| This picture reminds me of beef heart, which my dog consumes regularly. |

What I like about this is that you can see the many layers of cellulose if you look closely. This is one thick mother. :-)
Now that you've placed your scoby in a large glass vessel, add two cups of kombucha liquid, either from the booch that you've been storing your scoby in, or from a bottle of organic, unflavoured booch that you've purchased from a shop.

I use my own kombucha because I'm cheap, but if I were to buy it, I like GT's raw organic brand:

It is available at the Quartermaster, for those of you who live in London. It's ridiculously priced, 5 and change a bottle, which is why we're learning to brew our own booch.
So you've placed your scoby and 2 cups of booch in a vessel. Now you need to brew your tea. Boil 12 cups of water. Turn off the heat. Add 1 cup of sugar and stir until the sugar has dissolved. Add 6 tea bags of your choice (green, black etc). I usually use a combo of green or black, or just black. Basically, it's whatever I have on hand. Brew the tea until it's completely cooled. Remove the bags and place them in the compost. Carefully pour your tea into the vessel, with the scoby and booch, and seal it with a linen tea towel and an elastic. This will keep the fruit flies out while letting the kombucha breathe:

It will take approximately 6-14 days to brew your tea, depending on how weak or strong you like it, and what the weather's like (it will take longer to brew in the winter).
You can gauge the strength / intensity of your booch by taking off the tea towel, sticking a straw or clean spoon inside and sampling. I use this glass jug with a spigot (acquired at the Goodwill). It makes it very easy to sample the brew.

Once it's to your liking, reserve two cups of the booch and the scoby, and pour the rest of the brew into a pitcher and store it in the fridge. You can start a new batch using the reserved liquid and the scoby.
I like to serve kombucha on ice, with some frozen fruit thrown in. So tart and refreshing.

And that is it, my friends!


